

How Does Windows To Go Work
Did you know that a total copy of Windows can exist installed and run from a USB drive? Microsoft introduced "Windows To Go" with Windows eight Enterprise and has continued supporting the feature in Windows 10, which can be kept on a pen drive in your pocket as a portable operating system.
This feature is intended as a convenient way for workers to deport their corporate environments with them, but having your ain copy of Windows on a thumb bulldoze could be handy for fill-in purposes, also, or if you lot frequently use public machines that lack your preferences/applications or that have a restricted OS.
For a long time this was a neat thing you could practice with many Linux distros (we programme to cover Linux Live on a separate article soon), simply disallowment driver complications and hardware limitations, a Windows To Go bulldoze should boot from "most" computers.

Booting a Windows 10 "To Get" drive on a modern machine that shipped with Windows 10 is probable to piece of work fine, and because performance if ofttimes of the essence, a USB 3.0 port is always desirable. Older systems that originally sold with Vista or XP may work, likewise, only will have reduced processing ability and slower USB ports, pregnant they might not meet the minimum hardware requirements, listed beneath:
- The ability to boot from a USB drive
- USB 2.0 ports or ameliorate
- A 1GHz+ processor
- 2GB of RAM, and...
- DirectX 9 with WDDM 1.2 or greater
Microsoft'due south To Go documents note that a process called "respecialize" identifies and loads drivers for a specific car during the get-go boot-up, along with disabling drivers that aren't required. This profile is remembered and automatically selected on subsequent boot-ups. "In general this feature is reliable and efficient when roaming betwixt PCs of widely varying hardware configurations," the company says, and that's a "generally fair" argument based on our observations from testing.
On the upper side of performance, running Windows x To Go from a 32GB USB 3.1 flash drive was quite usable for general computing/basic productivity on an old desktop and a modern laptop. However, nosotros also experienced various complications when creating and booting different versions of Windows To Go...
Hardware and software configurations tested
Before we get to creating a Windows To Go drive, here's an overview of the testing that was performed using a diversity of hardware and software combinations as well as some recommendations and considerations about configuring a portable Windows drive.
Systems used for testing
- An sometime Core i5 Lynnfield-based enthusiast desktop PC with USB ii.1 ports
- A new Dell XP3 xiii 9370 laptop with USB-C ports & USB 3.one adapter
As a side note, the desktop also has a USB iii.i PCIe adapter carte, simply the motherboard's BIOS can't encounter or boot from drives fastened to this device. This is typical for USB expansion cards and worth mentioning in the outcome that you attempt to kicking from i. Here is more information on how to kick from a USB drive if the subject is unfamiliar to yous.
USB drives tested
- 16GB Patriot Xporter XT USB two.0 bulldoze (upwardly to 30MB/s reads)
- 32GB Samsung Bar Plus USB 3.1 ($9 drive with 200MB/s reads, 300MB/s on 128GB+ models)
- 128GB Corsair Flash Voyager GTX USB 3.1 ($47 bulldoze with 440MB/southward reads & writes)
None of these are officially "certified" for Windows To Go. Besides being fast plenty to run an operating system, certified USB drives are designed to appear as fixed instead of removable devices when plugged into Windows. Both types of drives can technically be used for Windows To Go, but only fixed ones volition work with the creation tool built into Windows x Pro and Enterprise.
We'll elaborate on this later, only notation that despite not being an official Windows To Go bulldoze, the Corsair Flash Voyager GTX does appear to Windows as a stock-still drive, it certainly meets the speed requirements, and is considerably cheaper than ~$200 "certified" options such as the Kingston Data Traveler Workspace, Kanguru Mobile Workspace and Super Talent Express RC4.
The aboriginal Patriot drive was included out of curiosity and its operation was as poor as you lot'd expect. Running Windows 10 on the 16GB USB 2.0 drive wasn't what we'd deem usable and no greater success was had with Windows 7 or 8. Sometimes the initial setup process for Windows 10 would BSOD or neglect some other way, and when the process did complete, the performance was slow to say the least, taking upwards of xxx seconds to open a menu for example -- if it would open at all. This configuration might only exist useful for a recovery environment if y'all had no other choice, though a lightweight Linux distro might make more sense on such a slow drive.

Conversely, the faster 200MB/s reads on Samsung's drive proved to be very usable for general computing/basic productivity on a Windows 10 To Get drive, excluding the occasional spot of lag. Nosotros purchased this drive at the recommendation of a reader. Again, this model technically isn't certified for Windows To Go and has relatively ho-hum ~30MB/southward write operation, which might thing depending on your use case. For reference, the write speed on a conventional hard drive is around 70MB/south.
Considering the fact that Samsung's drive simply costs about $x, it'due south a great budget solution if you lot want to create a Windows To Go drive for basic apply, although exist aware that y'all'll have to use third party tools instead of the one congenital into Windows x -- we cover both in this commodity.

From what we've seen, USB drives that are certified for WTG tend to accept read performance starting around the same speed as Samsung'southward drive along with equally fast write speeds (~200MB/south). However, every bit mentioned before, this level of operation is available for considerably less coin on "non-certified" USB drives, which can still be used for Windows To Go via tertiary party tools. Microsoft's official utility has other limitations likewise and nosotros imagine about of you will wind up using third-party tools.
Here are some additional not-certified drives that we recommend based on their cost and advertised speed (the first two are removable and not stock-still, the 3rd should exist fixed):
- $29 64GB Kingston DataTraveler Elite G2 - up to 180MB/s reads and 70MB/s writes
- $52 128GB SanDisk Extreme Pro - up to 420MB/s reads and 380MB/southward writes
- $198 1TB Samsung T5 Portable SSD - advertises up to 540MB/s reads and writes
Compared to the Samsung drive already discussed, the Kingston unit trades a few MB/s on reads for a few MB/s on writes, which should be meliorate counterbalanced performance-wise, at least on paper anyway.
Like the Wink Voyager GTX nosotros tested, the SanDisk Extreme Pro should eliminate any questions or concerns about the capacity and speed of your Windows To Go drive. These models are around the same price per gig (prices change a lot) just again, the Corsair bulldoze appears to Windows as fixed and not removable, which is ideal for a Windows To Go drive.

The best value WTG-certified drive we found was the 64GB Kingston DataTraveler Micro Duo USB 3 Type-C (not USB Type-A) for $21, though this drive's 100MB/due south reads and 15MB/s writes are slower than the non-certified Kingston drive listed in a higher place for $29.
Lastly, if yous were thinking about spending $200 on a faster certified Windows To Become drive, the Samsung T5 Portable SSD has 1TB of storage for the same price instead of just 64-128GB, is simply a lilliputian larger than a thumbdrive, touts read/write rates of up to 540MB/south and should appear to Windows as a fixed device.
Windows versions tested as portable
- Windows 10 Pro x32 and x64 (around 5GB vs almost 8GB -- more differences subsequently)
- Windows 10 Enterprise (required for the Windows To Go tool on Pro and Enterprise)
- Windows vii and 8.ane x32 (not recommended unless you know they piece of work on the host)
Although the 32-scrap version of Windows 10 (build 1803) occupied around 3GB less than the 64-bit version, 64-chip managed to load Wi-Fi and touchpad drivers for our XPS 13 while 32-bit didn't. If we had to approximate, you are more likely to encounter 64-bit-capable machines than 32-bit-exclusive machines at this point. At that place may be more 32-fleck systems in being overall, but most of them are too outdated.

We don't suggest using Windows 7 or Windows viii To Go unless you're sure they'll boot on the systems y'all'll exist using. Both generations BSOD'd during the initial setup on the XPS 13 9370 and even failed to load on our enthusiast PC from that era. Third-party Windows To Go creation tools besides tended to fail more frequently when using Windows vii and 8 images, which are less supported in general.
Windows 10 64-bit should have the all-time driver compatibility on the machines that you are most likely to use, specially if they are on the newer side.
Running Windows 10 64-bit from the ~$ten Samsung drive plugged into a USB iii.ane port was particularly usable. Booting the same configuration from USB 2.0 ofttimes saw a second or two of unexpected lag when opening menus or applications -- performance that we'd describe as "usable plenty" if necessary for creating documents, browsing the web and so on.
Meanwhile, running Windows ten on the Corsair Voyager was essentially duplicate from using Windows on any other SSD thank you to the drive'due south advertised 440MB/due south read & write performance.
Creating a Windows To Get USB drive
Windows' built-in tool for making Windows To Become drives is currently supported on Windows 10 Pro, Enterprise and Didactics builds. And while the cosmos tool is available on Pro, it still requires an Enterprise image file to create the Windows To Go drive -- amidst other limitations.
Fortunately, in that location are several means to get an Enterprise image. Microsoft offers a straight download of Windows x Enterprise ISO for evaluation after you fill up out a class, and you can download an Enterprise install.esd file directly from them as well.
You'll as well take to extract the install.wim file that's within a Windows x Enterprise ISO (in the Sources folder) or convert install.esd to .wim because the built-in Windows To Go tool only recognizes .wim files, not ISOs or other formats.

Install.wim and .esd are prototype files with organization data that tin be used for a Windows installation. You can convert .esd to/from .wim using DISM++, a third-party graphical user interface for Microsoft's DISM (Deployment Paradigm Servicing and Direction), which y'all can besides use directly from the Command Prompt.
Even if you have an Enterprise epitome however, the native Windows To Become utility won't work with most USB drives, including ii out of three of the ones we used for testing. As we've been saying, the congenital-in tool only works with select USB drives that appear to Windows as "fixed" and not "removable." This is a hardware attribute of the drives.
Historically, the main difference here is that Windows tin't mountain multiple partitions at once on removable drives (only the first primary partition is mounted), yet Windows installation drives tend to have at to the lowest degree two partitions: one with boot info, some other with the operating system. However, as of the Windows 10 Creators Update, the operating organization can mount multiple partitions on removable USB drives, and in testing we were also able to create a bootable Windows To Go drive with only 1 partition.

Regardless, although the 32GB Samsung drive is recognized by the congenital-in Windows To Go tool, the software explains that the device is removable and thus non compatible.
While the Corsair Voyager isn't certified for WTG either, this drive is stock-still instead of removable and does work with native utility, though the software recognizes that the device technically isn't certified. Again, most USB sticks are configured every bit removable, certified Windows To Go drives are set as fixed, while some non-certified USB drives are also configured as fixed and toll much less than WTG branded drives -- every bit is the case with our recommended Corsair Voyager XT.
You can decide if a drive is fixed or removable from Deejay Direction (search Start or Run for diskmgmt.msc). Look at the squares toward the bottom left where the drive descriptions say "Basic" or "Removable."
You lot can also check by inbound these 2 commands into Command Prompt:
wmic
logicaldisk get caption,drivetype
The output should be a list of drives with numbers next to them: 0 = Unknown, 1 = No Root Directory, 2 = Removable Deejay, three = Local Disk, 4 = Network Drive, 5 = Compact Disk, 6 = RAM Disk

If you have a fixed USB drive and an install.wim file extracted from an Enterprise ISO, the built-in Windows To Go tool should work largely every bit y'all'd look: you choose a bulldoze, choose an prototype and wait for the process to complete.
Making a removable drive appear every bit fixed
With some try and risk, there are several methods you tin try to make your removable drive appear as fixed, though in that location's not much reason to mess with this setting when 3rd-party Windows To Go tools will piece of work with non-fixed drives.
We aren't recommending these approaches just acknowledge there are various methods around the web that tin can either flip the removable media scrap on your flash drive or install a filter driver on Windows so the OS determines the drive as fixed. Keep at your own adventure, namely a bricked USB drive or blue screening Windows, the latter of which nosotros experienced when testing filter drivers and had to restore from a recovery image.
Third-party Windows To Get cosmos tools
Rufus is probably the most pop tool that can create a Windows To Go drive for Windows viii and 10, though information technology may non be so obvious at get-go glance. Hither's a quick guide on the Windows To Become creation process from Rufus 3.iii.1. This worked for both the removable and fixed USB drives that we used for testing:
- Select a drive and ISO similar you were creating a bootable OS bulldoze any other time
- Click the dropdown menu and cull Windows To Go instead of standard installation
- Choose your desired boot sector info (using MBR + UEFI throughout testing was fine)
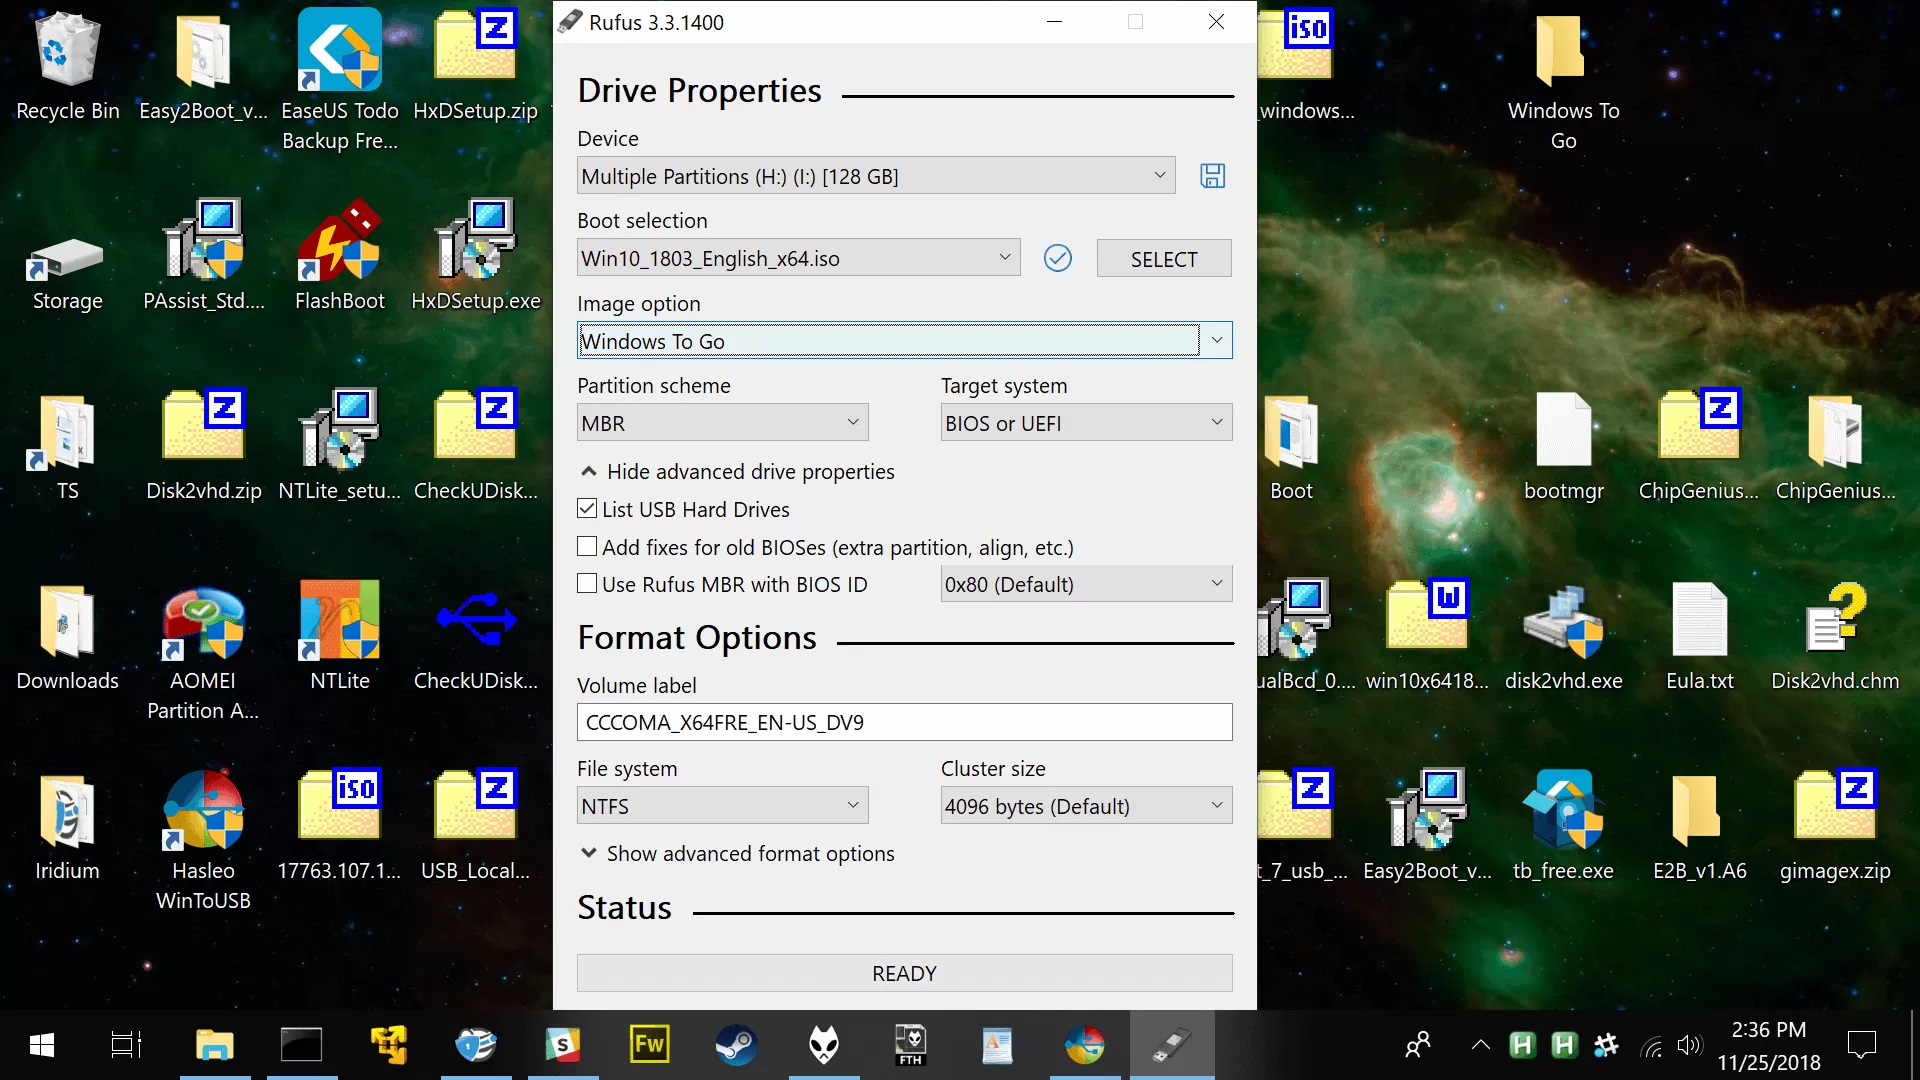
Windows 8, eight.one and 10 are supported (non Windows 7). Even so, Rufus 3.3.one doesn't list the Windows To Go option when using a Windows 10 1809 ISO while an 1803 ISO works fine.
The software might besides send a warning if you aren't using a fixed drive, though the resulting portable OS drive still works and in fact Rufus provided the best overall operation of all the Windows To Go creation tools nosotros tested, more often than not having less errors/failures.
"You lot are trying to install Windows To Become, but your target drive doesn't have the fixed aspect. Because of this Windows will near likely freeze during kick, as Microsoft hasn't designed it to piece of work with drives that instead take the removable aspect. Practise you still want to continue? Note: The stock-still/removable attribute is a hardware property that tin can only be changed using custom tools from the drive manufacturer. All the same those tools are almost never provided to the public."
While Rufus is the well-nigh unremarkably available third-political party tool we tin recommend for creating an "unofficial" Windows To Become drive, the software lacks some features that others provide, such equally the ability to export your currently running operating system onto a portable USB drive, though this is generally locked behind a paid license.
Here are many other tools that tin can make a portable Windows drive:

- WinToUSB - This tool is dedicated to creating Windows To Go drives and has already received an update to work with the latest build of Windows 10 (1809).
- Getting started: Select a Windows paradigm file (.iso, .wim, .esd, .swm) and continue with the prompts. The MBR + UEFI boot configuration requires a $30 upgrade, as does the ability to export your current Os (tools > Windows To Go Conversion).
- Aomei Segmentation Banana - Along with being able to create Windows To Go drives from paradigm files (.iso, .wim and .esd), this software includes a full drive partitioning suite in the same 11MB package -- convenient given the task at hand.
- Getting started: Click the "Windows To Go Creator" on the left and follow the prompts. The option to export your current Os is also in this magician, but only the paid Professional edition (~$l) has this feature enabled.
- FlashBoot - Has a multifariousness of features for USB drives, including the ability to create one that will boot independently from your primary operating system. Over again though, only the Pro version ($30) tin can clone your electric current OS every bit a Windows To Go drive.
- Getting started: Click Total Os > USB, select whether to prepare the bulldoze for UEFI or MBR-based systems and so you can choose a .iso or .esd file. The software can too apply the .esd file on your current installation (C:\ESD\Windows\Sources\install.esd) without downloading any boosted Os information.
Note: Mayhap all of the 3rd-party tools practise this, but FlashBoot's website mentions that by using registry/commuter tweaks the software "volition make removable USB thumb drives always appear every bit stock-still to Windows To Go."
Creation methods that are more easily-on
Before there were so many third-party tools to build a Windows To Go drive, the commonly recommended arroyo was to:
- Prepare the USB drive yourself from DiskPart in a Command Prompt.
- Utilise a tool to excerpt/install the install.wim or .esd file from a Windows ISO.
- Create boot entries on the USB drive, over again using the Control Prompt.
Useful downloads for manual creation: DISM++ | GImageX

Preparing the USB bulldoze for Windows To Become from Disk Management or DiskPart is simple: Delete the previous volume(due south), create a new volume, format that book, give the sectionalisation a alphabetic character and then brand that segmentation active.
At this point, the USB drive should be fix for you lot to install the operating organisation files from i of the aforementioned annal files.
Install.wim and install.esd contain compressed OS data that can be used to create a Windows installation or a To Go bulldoze. Your Windows ISO will have i or the other -- you just need one of them and you lot tin convert .wim or .esd files back and forth with DISM++ (GImageX requires a .wim file).
GImageX tin can apply the install.wim to a USB drive and this software is part of Microsoft's Windows Automated Installation Kit, though the total toolkit is more than 1GB to download whereas GImageX itself is only effectually 350KB (not MB).

Quick instructions for GImageX: Go to the Use tab > choose a source install.wim file and the destination USB drive > click Utilize.
After copying the system files, you'll also accept to create the kick data via Command Prompt using the Bone files that you merely copied to the portable bulldoze.
Enter the following line from an admin Command Prompt, where Thousand: is your USB drive (this should just have ane partition if you followed our steps, but if there is a separate segmentation for kick files then apply that bulldoze letter in place of the 2nd G:).
bcdboot.exe One thousand:\Windows /s G: /f ALL

If those methods aren't easily-on enough, Microsoft provides step-by-step instructions for creating a Windows To Go drive entirely from PowerShell commands, while this guide includes a customizable PowerShell script to automate some of the process along with extra features such every bit the power to inject drivers and patches.
Consign your electric current OS to a USB drive
This process is automated past many 3rd-party Windows To Go creation tools, but the feature typically costs money. Non wanting to pay for premium licenses, nosotros tested various ways to manually export our current OS from an SSD to a USB drive using a few gratuitous utilities and the Disk Management software already on Windows (diskmgmt.msc via Beginning or Run).
Useful downloads for a transmission export: Disk2VHD | HDD Raw Copy Tool

Hither'south an overview of the process we used to clone our actively running copy of Windows 10 Pro to a thumbdrive:
- Employ Disk2VHD to create a VHD (virtual hard disk) image file of your Os drive. This is a total re-create of the drive in i file so yous'll need enough storage for that.
- Mount that VHD file with a drive letter in Windows: Either right-click the file and choose Mount or open Disk Management and go to Action > Attach VHD.
- With the VHD mounted, HDD Raw Copy Tool tin clone the virtual drive to a physical bulldoze (whether fixed or removable, including regular USB drives).

The USB drive might boot after cloning the VHD, though several times during testing we had to reapply boot information to the drive from an admin Command Prompt. You lot'll also desire Disk Management open to see how many partitions are on the drive and what letters are assigned to them.
Entering the following line into an elevated Command Prompt will apply the boot information (I:\Windows is where the kicking data is being copied from while H: is where the data is existence copied to).
You'll desire to apply the boot data to/from the Windows sectionalisation(s) that have been cloned to your USB drive, non C:\Windows. If there are two partitions on your USB drive, apply the kicking files to the smaller one, while if there is but a single partition then yous tin apply the boot data at that place.
bcdboot.exe I:\Windows /due south H: /f ALL
Using "/f ALL" with that control includes files for both UEFI/MBR BIOS.

Throughout testing, nosotros also successfully made Windows To Become drives by manually creating a 500MB partitioning for kicking files on the USB drive along with an OS division via Disk Management.
Then we mounted the VHD as described but used File Explorer to re-create all the files in the VHD to the USB drive's OS division (this was much slower than cloning with HDD Raw Re-create Tool and didn't work as reliably -- you can employ the kick data to the offset sectionalisation via the method mentioned above).
Note that the gratis version of WinToUSB automates the creation of a Windows To Go drive using VHD files (VHDX requires a license) and the resulting drive boots directly from the VHD file.

Withal, our Windows To Go drive loaded to a blue screen fault that read "VHD Kicking Host Volume Not Enough Space" and required a registry modification to the organization inside the virtual hard bulldoze, making as much or more piece of work out of the WTG cosmos procedure than our manual method above.
If you are going this route, you might as well change the registry setting on your system before creating the VHD then you don't accept to load the registry hive separately later. You want to change the following registry key so the DWORD value is 4 instead of 1 to foreclose the virtual disk from expanding when mounted.
With this setting applied, the VHD-based drive created by WinToUSB finally booted:
[HKEY_LOCAL_MACHINE\SYSTEM\CurrentControlSet\services\FsDepends\Parameters]
"VirtualDiskExpandOnMount"=dword:four

We also noticed that DISM++ can create a .wim file of your currently running copy of Windows with the "System Fill-in" selection, and this could presumably exist applied to a USB bulldoze, though nosotros didn't follow through on this method because the functioning was taking considerably longer to complete than creating a VHD and cloning that.
Additionally, note that Rufus can copy VHD files to USB drives, though you might have to configure the boot information beyond the control mentioned above (links at the end of the article should get you started).
Also, Deejay Direction can create an empty VHD file (Action > Create VHD) where yous can utilise an install.wim file along with boot data, at which signal you tin clone this virtual drive to a USB bulldoze as a Windows To Go workspace.
All-time practices and configuration tips
From the user's perspective, the get-go fourth dimension Windows To Become is booted it performs some initial configuration before presenting the familiar setup process that you go through on whatever fresh Windows installation (creating a user account substantially). After that, the operating system loads up as if it were installed on any other drive.
For the most part, this is a full Windows installation, though there are a few differences in configuration and usage practices.
Disabled functionality on Windows To Become:
- Internal disks are offline. This prevents data from being exchanged between the Windows To Become bulldoze and those in the host machine. These drives can be enabled but it's not recommended because if the host auto is hibernating, yous'll delete that user state and whatever unsaved data along with it. This may also corrupt the host PC's operating system.
- Hibernate is disabled by default. Hibernation can be re-enabled on the WTG drive, though there isn't much sense in hibernating on one auto/configuration and and so attempting to reload that session on another system. Hibernation also occupies a significant amount of storage.
- Trusted Platform Module (TPM) isn't used. When using BitLocker Drive Encryption, a pre-operating system boot password will be used for security instead of TPM, which is spring to a specific estimator and Windows To Go drives volition move between computers.
- Windows Recovery Environment is excluded. Microsoft says you should re-epitome the Windows To Go drive instead. Likewise, refreshing/resetting is disabled (resetting to an OEM'due south standard doesn't apply for Windows To Go).
- Upgrading a Windows To Go workspace besides isn't supported. Older Windows 8 or Windows viii.1 Windows To Go workspaces can't be upgraded to Windows 10 workspaces, nor can Windows 10 WTG be upgraded to time to come versions of Windows 10. For new versions, the drive needs to be re-imaged with a fresh copy of Windows. Nosotros did non test the software, simply Hasleo (the WinToUSB developer) has a Windows To Go Upgrader.
All-time practise suggestions for using Windows To Become:
- E'er shut down Windows and await for shutdown to complete before removing the Windows To Go drive.
- Don't insert the Windows To Go drive into a running computer.
- Don't boot the Windows To Become drive from a USB hub. Because of power requirements, ever insert the Windows To Become drive directly into a port on the computer.
- If bachelor, use a USB iii.0/3.i port with Windows To Go.
- Practice non install non-Microsoft core USB drivers on Windows To Go.
- Suspend BitLocker on Windows vii host computers earlier changing the BIOS settings to kick from USB so resume BitLocker protection.
- If you lot unplug the drive while Windows To Go is running, Windows will freeze and you have 60 seconds to plug the drive back in. Subsequently sixty seconds, the reckoner volition close down and your session will be lost.
- Subsequently removing the drive without shutting downwards properly, it'southward suggested that you non plug the WTG drive into another system for take a chance of corrupting critical system files.
Ideally, network drivers will be automatically loaded when yous first boot into Windows To Go, at which point any other drivers can exist downloaded from Windows Update or elsewhere.
After installing a few applications on a fresh WTG drive we started receiving notifications from Windows well-nigh the 32GB Samsung drive running depression on space, though there was nevertheless effectually 10GB free. Considering hibernation and system restore are already disabled by default, there aren't many options for saving space on a stock Windows To Go install.
If storage capacity is a business organisation, yous may want to create your drive with the Enterprise LTSC build of Windows 10, which excludes bloat such as Cortana, the Windows Store and virtually every other pre-installed application -- including Microsoft Border (we installed Iridium).

We reclaimed an boosted 2.55GB of space on a fresh Enterprise LTSC install past compressing the operating system with the following line from an administrator Command Prompt:
Compact.exe /CompactOS:always
While the LTSC build of Windows x is already pretty barebones, more built-in applications, drivers, updates and other operating system components can be added or removed to an installation image past loading the install.wim or .esd into NTLite, which can be used to create a Windows 10 ISO as lean as 700MB. If you're going this route, hither's another detailed guide on configuring Windows ten components.
Getting started in NTLite: Add a .wim or .esd file. Right click that file when it appears in the software and choose "load." When the loading process completes, you should come across options on the left column.
Depending on the speed of your bulldoze and host organisation, you might also desire to disable animations for menus and windows, which can improve performance on lower-stop machines and Windows is visually snappier without these settings enabled.

How to detect these performance settings:
- From the Command Panel: Organization > Accommodate the appearance and performance of Windows > Visual Effects tab...
- From This PC: Right click This PC > Properties > Avant-garde system settings > Advanced tab > Performance Settings...
The gif in a higher place demonstrates the speed departure of opening and closing OpenShell with and without one of these performance animation settings enabled ("Fade or slide menus into view").
After yous've configured your Windows To Get installation, you might want to make a backup prototype of the drive so the operating system can exist reapplied with your customizations (hint: Rufus tin can create an image with the salvage icon next to your USB bulldoze).
Some parting commands and other useful resource:
- SFC /scannow | Performs an integrity cheque and replaces decadent system files.
- DISM /Online /Cleanup-Paradigm /RestoreHealth | Runs a similar system repair scan.
- C:\Windows\System32\sysprep\sysprep.exe /oobe /generalize /shutdown | Removes PC-specific information such every bit installed drivers, shuts down and reruns the initial setup process on the next boot-up.
- slmgr.vbs -rearm | Rearms the Windows trial period and lets yous admission all the features on a non-activated copy of Windows -- useful if not cloning your activated Os.
- Easy2Boot | Software that can apply a boot menu to your USB drive which among other features can direct boot from many of the image file types mentioned in this article (.iso, .wim, .vhd).

- HeiDoc.cyberspace Windows Download Tool | Provides an interface for downloading original Windows ISOs directly from Microsoft's servers, including Windows vii/viii.one, Insider Preview/Developer/Enterprise builds and old versions of Windows ten.
- Here are Microsoft's own guides on building a Windows To Go drive, native booting from VHDs on a USB drive, as well as editing Windows boot files with BCDBoot and operating DISM via Command Prompt.
More Useful Tips
- Ameliorate Windows Start Menu's Search or Simply Install a Improve Replacement
- A Compilation of Command Prompt Tips, Tricks & Cool Things You lot Can Practise
- "Run equally Administrator": What Does It Hateful?
- Ways to Free Upward Storage Space on Windows
Source: https://www.techspot.com/article/1751-windows-to-go/
Posted by: ericksonmades2000.blogspot.com
0 Response to "How Does Windows To Go Work"
Post a Comment